Burstin' at the Seams!
Whoa everybody! My bad! I'm still new to this blog-scene and didn't realize it would take me so long to update y'all with a new post!
Anyways! Back to the apartment. As I said in my previous post, one of the few downsides to our new place is the lack of closet space, especially in the Master bedroom. We both have a decent amount of clothes, but most importantly, we've always had our own closets, and even then, we were always squeezing everything in.
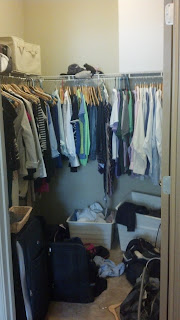
Our closet consisted of one builder-grade wire shelving at eye level. This was just not going to do. I'm warning you (my Dad especially), what is contained in the following pictures is pretty awful. Are y'all ready? Ok.
Yikes!
Shameful!
I'm sorry. I realize that was pretty bad. The worst part is, those suitcases, are all stuffed with clothes! There were additional suitcases and plastic storage bins in the bedroom. Things were out of control. So while Branch was attending orientation, I decided to take matters into my own hands!
I decided the first thing we really needed was at least one lower shelf. The closet is in a rectangle (with the door being on the short end). Branch's shirts are longer and if we had put a shelf under the existing shelf, he was concerned his clothes would be too long and would be crumpled up at the bottom. So step one was to remove the shelf along the long wall and move it up high enough to leave room, but still at a comfortable height for me to reach clothes.
Step 1: Be lazy and only remove half of the clothes from the closet
Step 2: Remove the bar from the wall.
This step really wasn't that hard. The shelves come with little brackets that have been nailed into the wall. I just used the back of the hammer to pry the clips and support bars loose. Since I was by myself (and let's face it, have zero photography skills) I didn't take pictures of the next steps. Basically, I moved the shelf I just removed up 6 inches. I then installed a new shelf the full length of the wall. When purchasing the new shelf from Home Depot, I discovered that it came in a length longer than the wall. Fortunately, the friendly people at Home Depot are willing to cut shelving to size so I ended up with two shelves and installed that one above the existing shelf on the shorter wall.
The end result:
Can you believe it!? It's so roomy now!
Oh, so much more organized!
What a difference an extra shelf has made! All our pants/skirts have been moved to the bottom shelf. Branch's polos and button ups make up a bulk of the long shelf. I have the back third and short wall. I also have knits folded on the wood shelves we added on the opposite wall. We store frequently used suitcases in the back corner, and our larger suitcases are on top of the higher shelf. One the highest shelf, we have stored infrequently used items like an air mattress and my wedding dress. This freed up floor space for an extra shoe rack for spillover from the entry way shoe storage (to be posted soon!).
So what do y'all think? Did I do an ok job?


.jpg)
Great job! Adding the extra shelf is what we did too and it made SUCH a huge difference!
ReplyDelete